
This new feature allows for your office to show “Meaningful Involvement” on accounts then it gives you a way to create an hourly or flat fee invoice.
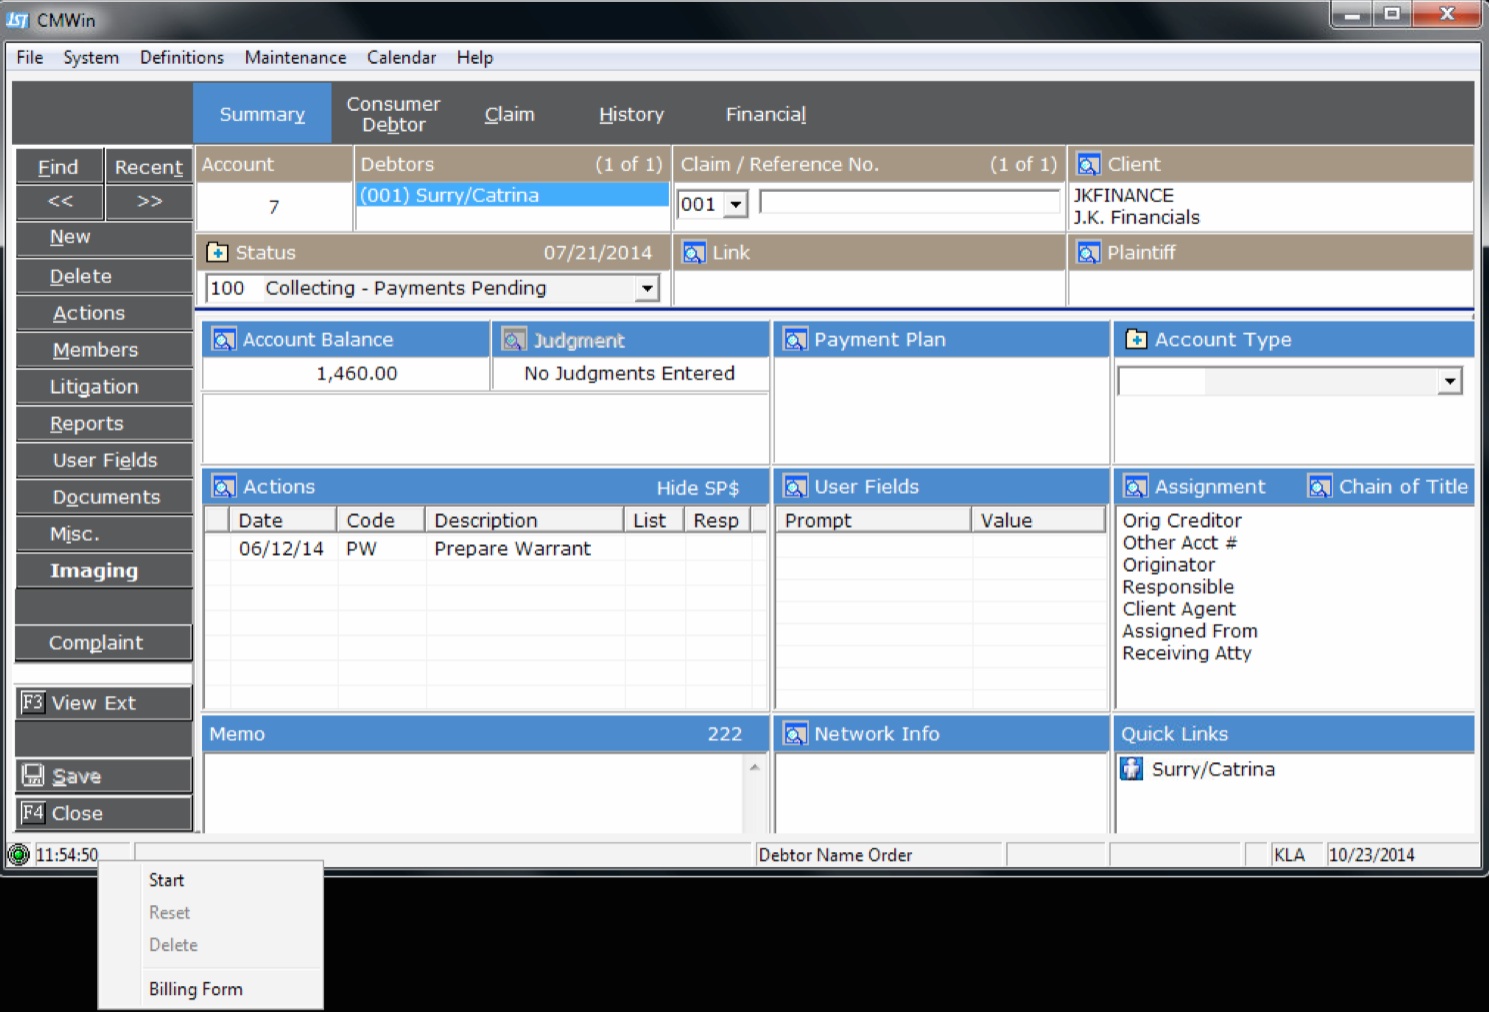
We now have a timer on the bottom left of the main menu screen. Once you are aligned to a Consumer Debtor’s account, it will allow you to track the time spent on that account.
Aligning yourself to an account can access this Time & Billing form and then you can right-click and select “Billing Form”.

It will allow you to track the following “Billing Types”:
The “Billable” option- Records the rate and increments for hourly billing. This option will participate in remits.
The “Flat Fee” option- Records the flat fee amount assigned to the Billing Type Code you selected. This option works like our “CFEE” transaction, which has been in place since V1, however we have enhanced it to track the time spent on the account. This option will participate in remits.
The “Non-Billable” option-Does not record any amount, rate, or increments it is solely used for time tracking how long users are spending on accounts without you billing the client. This option will not participate in remit.
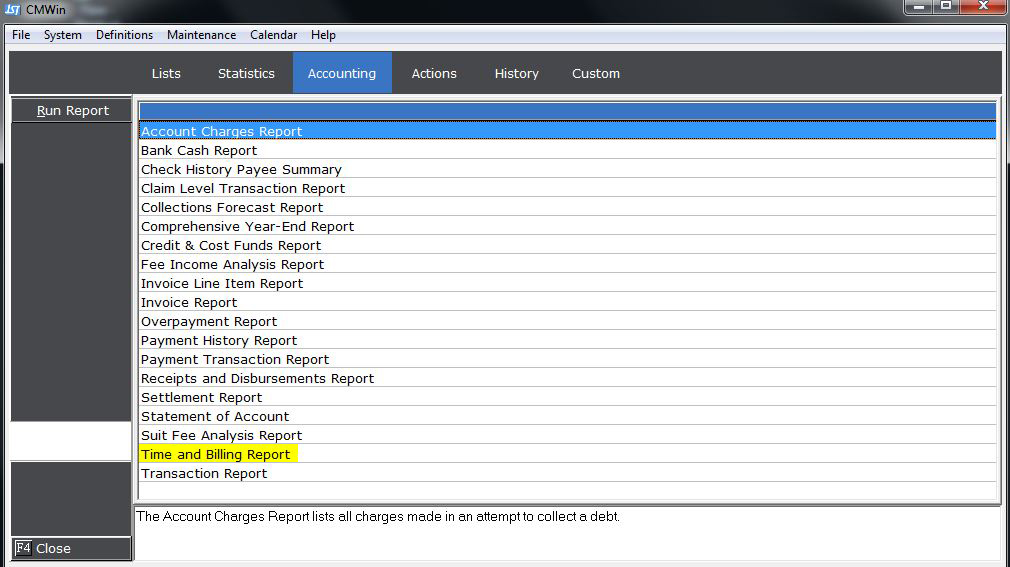
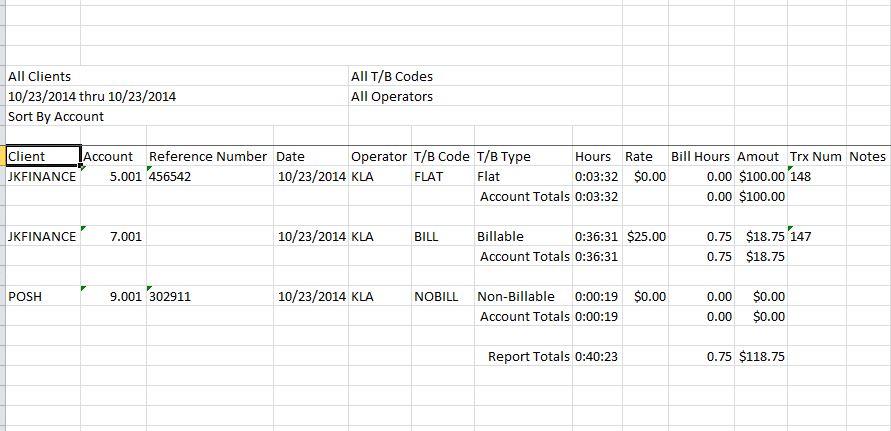
We also added a new report under the “Accounting” tab called “Time and Billing Report” which exports to Excel.
In order to use this feature, it requires that you set up your different “Billing Types”, for all your “Billable”, “Flat-Fee”, “Non-Billable” options. Please keep in mind that the instructions below for setting up your “Billing Types” are examples of all the “Billing Types”. In implementation, you are not required to use all these options. It will allow you to set up only the “Billing Types” you need.
1. From the Main Menu select “Definitions” and then “Codes” and then “Time & Billing”.

to display the Time & Billing Kind Form.
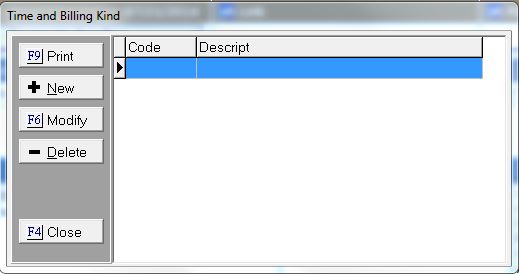
2. Select  button.
3. Enter your “Code” name. It will benefit you to know what “Billing Type” you will select when selecting your name.
4. Select your radio button for the “Billable”.
![]()
5. Enter your “Description”.
6. Enter your “Rate”.
7. Enter your “Increments”.
8. Entering a “Default Note” is optional.
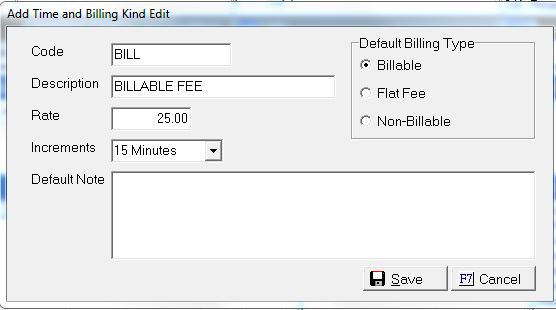
Reminder: The “Billable” option records the rate and increments for hourly billing. This option will participate in rem
9. Select the  button. If you do not want to save your choices select “Cancel”.
10. Select button.
11. Enter your “Code” name. It will benefit you to know what “Billing Type” you will select when selecting your name.
12. Select your radio button for “Flat Fee”.
![]()
13. Enter your “Description”.
14. Enter your “Amount”.
15. Entering a “Default Note” is optional.
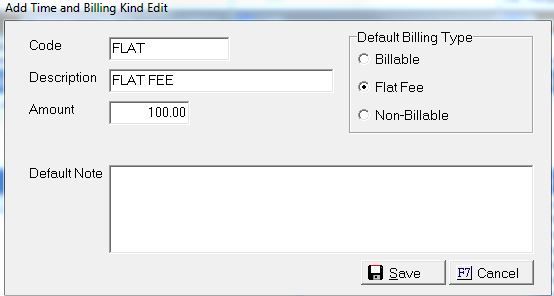
Reminder: The “Flat Fee” option records the flat fee amount assigned to the Billing Type Code you select. It works like our “CFEE” transaction, which has been in place since V1; however we have enhanced it to track the time spent on the account. This option will participate in remits.
16. Select the  button. If you do not want to save your choices select “Cancel”.
17. Select button.
18. Enter your “Code” name. It will benefit you to know what “Billing Type” you will select when selecting your name.
19. Select your radio button for “Non-Billable”.
![]()
20. Enter your “Description”.
21. Entering a “Default Note” is optional.
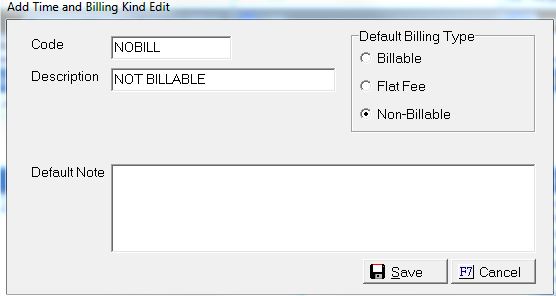
Reminder: The “Non-Billable” option does not record any amount, rate, or increments it is solely used for time tracking how long users are spending on accounts without you billing the client. This option will not participate in remit.
22. Select the button. If you do not want to save your choices select “Cancel”.
To initiate the Time & Billing feature you must be aligned to a “Consumer Debtor’s” account.
1. From the “Main Menu”, select the “Consumer Debtor/Adverse Party”.
2. Select your “Consumer Debtor” by using any of our “Find by” options.
3. Navigate to the bottom left of the screen.
4. To initiate the timer, you have a few options to accomplish it:
Option 1.
You can select “Start” or double click in the time section. Once the timer has started you will see the time displayed in red.
Option 2.
You can select “Billing Form” and select the  button.
Things to Remember:Once the timer is active, the timer will “Pause” automatically when the Billing Form loads. Select “Pause” at any time to freeze the timer.
You must click the “Resume” option to continue the timer or you can also select the “Reset” button to go back to 00:00:00.
When you attempt to navigate to any other account while working an account with time/billing activated, you will get the following message.
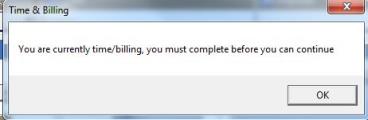
To proceed you must “Delete” the billing form or “Complete” any existing time before proceeding.
1. Right-click on the clock located at the bottom left of your screen and then select “Billing Form”.

2. Then select the  button. The following pop-up will appear.
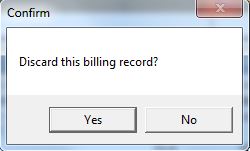
3. Select the “Yes” button and it will delete the existing billing record.
Things to keep in mind: You can also Delete a billing time record by right clicking and selecting “Pause” and then when you right-click again the “Delete” option will be available to you.
1. The bottom left of the screen where the clock is located you can right click and select “Billing Form” or you can double click to launch the Time & Billing Form.
2. Select the “Associated To” option by clicking the drop-down. We allow you to select the appropriate claim the time should be associated to.
3. Select your “Time & Billing Kind” by using the drop down. If you need to add a code you can access the  button and it will allow you to create a new time and billing “Code”.
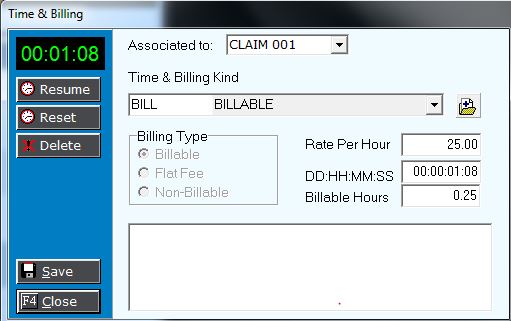
If you select the radio button for “Billable”:
This option will show you the Rate Per Hour, DD: HH:MM:SS, and Billable Hours.
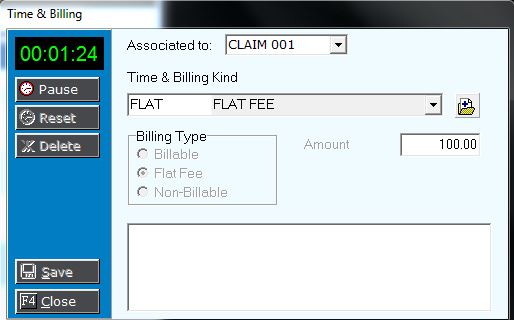
If you select the radio button for “Flat Fee”:
This option will show you the amount of your flat fee.
If you select the radio button for “Non-Billable”:
This option will only show you the time.

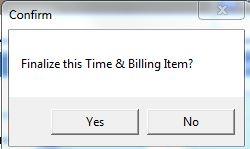
4. Select the  button. The following pop-up will appear.
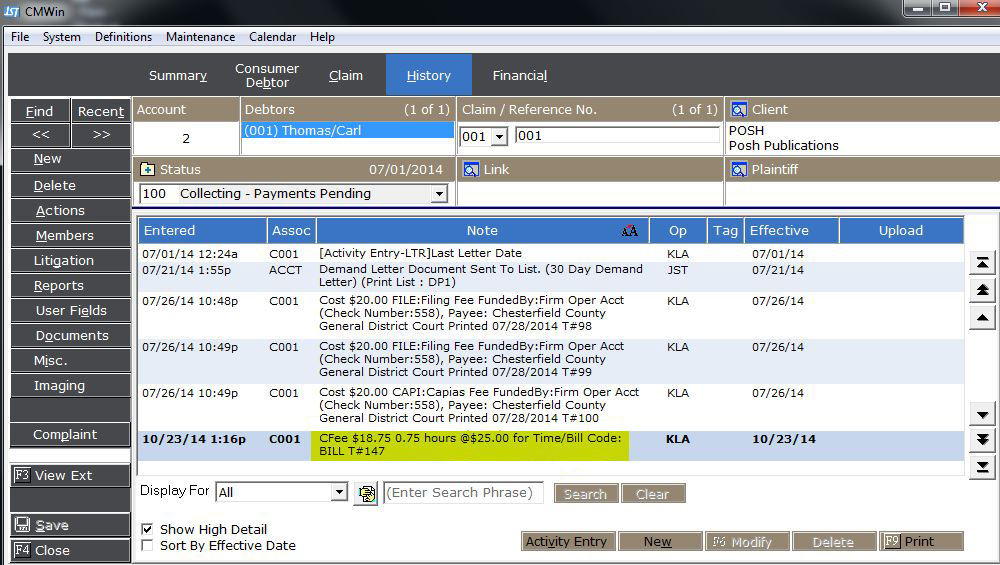
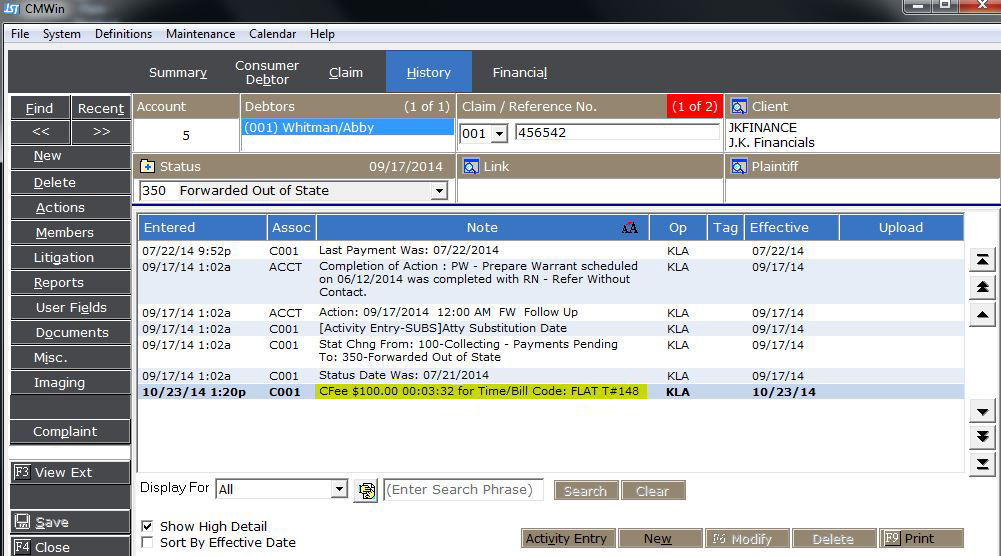
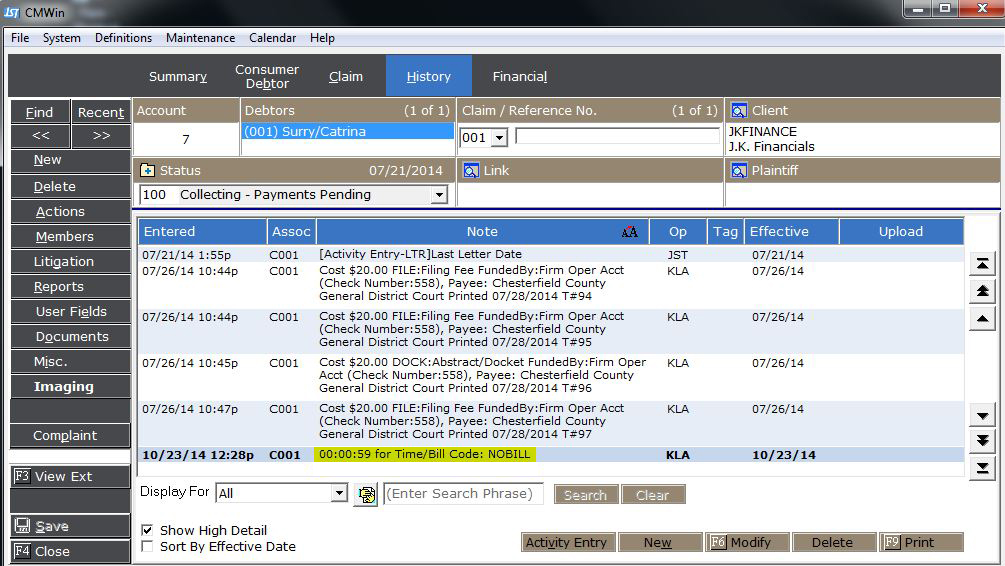
5. Then select “Yes” button it will save your entry and create the appropriate transaction based on your “Billing Type”. The following screenshot will show you all the options for how a “Billable Item” appears in History.
History for a “Billable” Item:
History for a “Flat Fee” Item:
History for a “Non-Billable” Item:
6. Select  button and it will return you to the “Main Menu” or proceed to the next account.
To track all of our Time & Billing records we provided a convenient way for you to track and manage your data. This report exports to excel.
1. From the "Main Menu" select the  button.
2. Select the “Accounting” tab.
3. Select the “Time and Billing Report”.
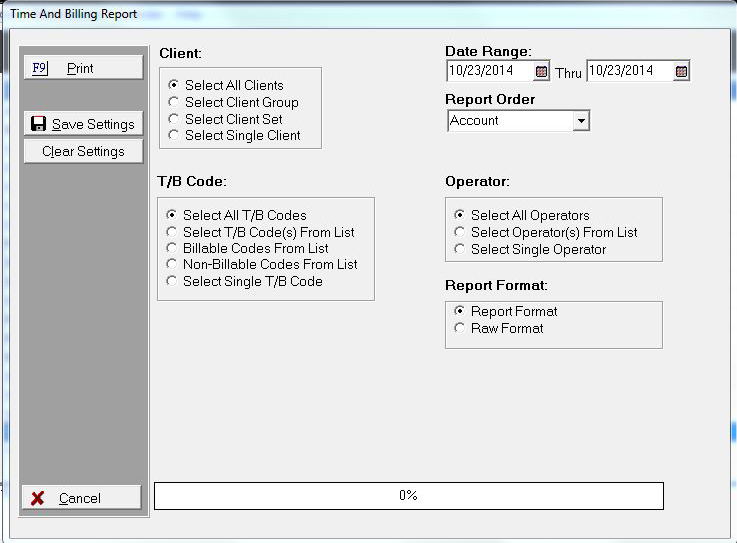
4. Select your selection criteria, “Client”, “Date Range”, “Report Order”, “T/B Code”, “Operator”, and “Report Format”.
5. Select the  button and the following screen will pop-up:
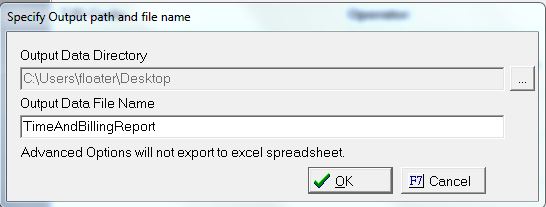
6. If you want to make any changes to the Output location or the Name of the file, do so before clicking the  button.
7. Then the following pop-up will appear:

8. Then click “Ok”and then navigate to your report.
Things to Remember: This report does not act as a remittance.